Central Texas has extremely mild winters. I had high hopes for this winter because we actually have been having what y'all overseas* folks call fall. Well, the news is out and "they" are predicting a mild winter here this coming season. Now I am not certain if "they" mean a normal Central Texas winter or an even milder one.
SO not to stop my ramble, but I will get to the point. I made this little scarf last week with our predicted mild winter in mind; Also I was having the onslaught of a cold and my sweet "Dr" told me to keep my self covered across the neck and chest. This would keep all that wind out.
I have been wanting to make a skinnier version of these long knit scarfs I saw last season ..I think at Old Navy. I like that you can tie a pretty bow or just do a loose job.
Ingredients
one flat knit sheet any size or 2 yrds of knit fabric
sharp fabric scissors
chalk
tape measure
***The sheet is the easiest method because you simply lay the sheet out and the top to bottom length is your scarf length.
**** the st etch of your fabric should be in the width of your scarf
1. lay out sheet or fabric out nice and flat cut off the hem if there is one. The stretch of the fabric should be with the width of your scarf.
2. measure in reg intervals 6 " from your edge the entire length of your fabric.
3.Using your Fabric scissors cut along your dotted chalk lines.
4. tie your scarf on.... like, i said I like the bow tie look.tight or loose
*ps...here is my new fave song that includes this" overseas" ref
Wednesday, October 27, 2010
Monday, October 18, 2010
crafty ghoulash...
~October is sort of like December 'round here. Halloween is definitely the favorite family holiday and we have two birthdays this month to boot! Along with the change from summer to fall( and we are having a fall this year!)this all makes September and October monstrous for me. I actually had an interesting conversation about this with my yoga mentor a few weeks back. She says ( a little more eloquently)that everyone experiences a bit of anxiety going through this seasonal change. She says we are moving from a time of fire into a time dominated by air and that calming your heat can help you through the change ( and to help not get all flared up). So that has been my focus. Trying to control and flush out some of my heat ( excitement and overflowing of ideas) and smoothly transition in to air( getting some of those ideas done and letting go of the rest)
SO to help me with my transition I thought I would take a moment to check in and see where I am and share...
~I made this simple apron set for a favorite couple who were recently wed. ...I mentioned I made this dress for their celebration but did not show their gift set yet. I also made a set of hand dyed pale yellow linen napkins using a repurposed linen table cloth. Included with the kitchen set was copy of this favorite new bake book of mine. Here it is all wrapped up. I really like giving napkins with aprons.( early Christmas ideas)
~I also made this inspiring custom apron for a very special friend. Her request was for an owl and we loosely decided on a palette. Her napkin set will include a mix of the fabrics used in her apron design. Other than that she let me run free. It looks so lovely on her and was so fun to make.
~Also I had my first A-line skirt class in which my friend wore her lovely apron and made her first skirt! Blue mama also joined in the fun and made the cutest little fall skirt that I am eager to see and show off finished! Both ladies learned how to wind a bobbin in the beginning of class and ended with a skirt they had made themselves! (oops...This class accidentally fell on the Holy musical weekend of ACL ...so needless to say it will be a repeater...)
~And more stuff
Here is a new pattern I have been working on for a skirt made from a sheet. I have worn this one the last 3 date nights and made it look different each time( although I have not remembered to take photos). I still have not even hemmed it; totally into the grunge look of the unfinished hem!?...you could say I am loving it.
It is cut on the bias to give a lovely full flow and the waist obi is made from the top band of the sheet . I have a few kinks to work out but I am hoping to offer it up as a tutorial by Christmas.It is crazy simple and so comfy to wear plus it is such a flattering versatile cut.
I made this custom humming bird skirt from the pattern minus the obi belt, and plus the extra band on the length I love the colors we chose for this one.
...and this little hummer is steadying herself just like me.
Friday, October 8, 2010
Paper Leaf Print Lanterns Tutorial
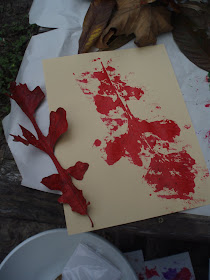
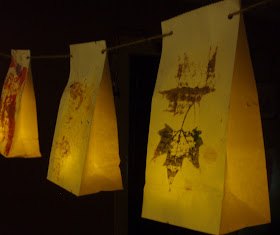
~Burger and I made leaf lanterns last week and I wanted to share this fun easy project. The idea sort of evolved out of a project from this super terrific kids art book. Her project is simply put the paint on the leaf with fingers and then the leaf on the paper . The lantern idea came because we had a not so much paper but a bunch of little brown bags. I thought I could still use the bags and they would have nice leaf prints on them. I liked them so much I thought we should hang them up like bunting. Then I sad to myself " how cool if they had little lights in them?". So put lights in them but they were a little dark. I decided to try again with white bags.
I made quite a few changes but the best one was we used a roller( the brayer in the photo) to imprint the leaf on the bag.
Materials
paint ( we used tempera)
leafs assorted shapes and sizes
5-8 white pare bags
a small roller( used a brayer but a small rolling pin would work fine)
twine or cord to hang your lanterns on
hole punch
a few sheets of paper( plain ole paper or news print)
led lights optional ( i got some cheap at big lots)
process
1. ink(paint) your leaf
2.lay the leaf paint side down on bag
3.back it with a piece of paper( we forgot to do this a lot)
4.roll brayer over leaf with even pressure
5.remove leaf
6.repeat 1-5 till all bags are printed all over. ~We put one leaf at a time on each bag then went through them all several times til we felt fulfilled
7. punch 2 holes through the top of each bag at the corners
8. put a little light in each bag and string um up! I tied knots on the first attempt but did not on the second. As it turned out we did not need the knots so much.
9.hang it up and enjoy your falling glowing leafs. I think they are lovely with or with out the lights but the kiddies always love the lights so I think that made it more fun for the burger.
~ This project is all about the process so you may only have a few leaf prints that actually look like leaves. It was fun for us to gather the leaves and then print and watch how our brightly colored paints melded together into a beautiful fall palette. ...have fun!
Monday, October 4, 2010
A line skirt class +photos from the tote class
I am having a basic A line skirt class this Sunday October 10Th, you can sign up here or email me at bellesouthgirl at yahoo dot com. There are a few spots still open. This is a class for a very simple, elastic waist, A line skirt. ...It is my pattern so we will draft one to fit you in the class. This skirt pattern is super versatile and easy.There are all sorts of variations I will be sharing with you. I will message the materials list to the takers. cost is $25
~Here are some photos from the last class, the fabric scrap collage tote class.
I love how everyone did there own design and combined all types of fabrics. The results were beautiful! ~You can see more photos of this radish on the designers blog. ~Everyone had such great ideas and really followed through. I love sitting around with folks stitching and tossing around ideas....
.......So very inspiring!