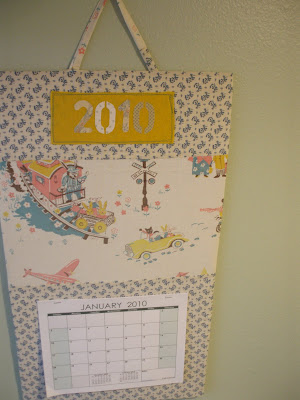
I was searching for a perfect calendar for my new blue kitchen when I decided why not just make one. Yes I realize we are a half a month into the year and many folks probably have their calendars but can't you always use another? ( or better yet one of the variations I discuss at the bottom). I have so many swatches of treasure fabric that would make a perfect focal point for a wall calendar. What was even more appealing about this project than using treasured scraps as the focal point, was that I made the whole enchilada from things I already had in my sewing studio or around my house.

At first I thought I would sew a collage for each page. But a collage for each month is just too thick....so I could scan them in right which is nice if I am making 20 but I just want one (or 3 different ones)? And plus you loose the fabric as art effect.

OK, as per usual I was making something more difficult than it need be( this is how my creative process unfolds before me) So here is the simple version. I would have one fixed image with changing calender pages. I decided to mount the calender on a fabric covered board with an attached hanger.

Now I have lots to suggest for this project. This can be a no sew project very easily. All you do is use one piece of fabric for the background. If you want to have an image on top of your background fabric you can simply use the
heat and bond lite ( my new favorite
fusible webbing)to iron on another piece of fabric with your image cut out of it, I want to do a cat silhouette for our Mae Me. If you are opting not to sew you would also need to glue the handle on the top in back.
A word about the heat and bond. I only bought it because my local big craft meglo store was out of Wonder under.With that said ... I love heat and bond lite. It was cleaner, easier and more sure fire in the application than wonder under . However, I have not tried it on wearable art yet. I will keep you posted on those trials. I am afraid it might be a little thick for clothing but we shall see. And of course the heat and bond name is not as super fantastic as WONDER UNDER! Moving right along I chose to do a patchwork of fabric for my background which of course I used my sewing machine for. I am planning a tutorial that will be a simple patchwork pocket to give ya'll an easy guide as to how I make all these patchworky things. One more suggestion is that you might make a
fabric scrap collage as your focal point and just applique it to a larger piece of fabric for your background.
materials*glue gun
*staple gun
*sewing machine(optional)
*scissors for paper and fabric
*rotary cutter(optional)
*fusible webbing (i used heat and bond lite)
*fusible interface
*felt
*fabric
*Iron
*loop turner(optional)
*card board
*2" stencils for year label (or other label you might use...like I was gonna write"Yee Haw" on the rodeo calendar but got
LAZY)

*one printed calendar you can find one on-line or you could use one of the freebies you pick up at the bank or what have you. I designed this calender board based on an 8.5X11 printable
here. I chose two, landscape in red and green
Instructions1. measure and cut the following

1.Card board(I used a home depot moving box)15"x26"
2.Felt for backing 15"x26"
3.fabric for background 17"x27.5"
4.fabric for hanger 11"x2"
5.fabric behind hanger 18"x3"
6.fabric or felt for year applique' 7"x3"
7.fusible interface 15"x26"
8. trace your year or other label (backwards) onto the back of the fabric that you have back with heat and bond and cut

(to make it all smoother make sure all your cut fabric is pressed)
I am an eyeballer.... so I cut my cardboard, then use that to cut my felt and so on...I am not saying you should be like me but you can see from my results that eyeballing it can get the job done.
2. Sew the hanger.

Press the fabric for hanger 11"x2" in half length wise. sew with 1/4" seam allowance the entire length of hanger. turn right side out using your
loop turner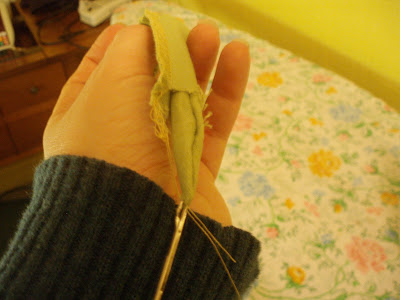
(if you do not have this simple extremely helpful tool use this as an excuse to get one they are cheap and invaluable for turning tiny tubes)
Press.
3. Attach hanger.

Make a sandwich starting with the background fabric right side up the hanger looped inwardly and centered on the top edge of background fabric topped by fabric behind hanger 18"x3"right side down. Pin it all in place
sew along entire width of the sandwich edge with about a 1/4 "to 1/2 " seam allowance

catching the hanger and press the seam.
4.Make your Year label and attach ~
I used felt on one and fabric on the other. You could sew them on or just heat bond them, like I did. I probably would have used pinking shears on this but I will tell you my dirty little secret, I do not own any pinking sheers! (and yet I still am able to make stuff). attach the year label to your background fabric, I sewed mine on but you could also heat bond this.

Which ever attachment method you choose, make sure to position your label relative to all of your design elements including the parts that you will fold over . I put mine at the top.
5.apply interface 
to center back of background fabric.
 6.measure and mark
 the center of your fabric and the cardboard at both ends .
7. Glue background fabric to the cardboard.

lay the fabric wrong side up with cardboard on top, Line up your center marks on top and bottom. You want this to be tight and even so I start at the top flap and glue right under the seam that you made with the hanger attachment. Then I glue down the flap. Then I flip it around and glue the bottom edge next pulling evenly and taunt

I glue the sides the same way. I trim the corners a little to keep it from being too bulky under the felt backing.
 8. Position and glue felt backing.
I start again at the top here and glue across the top

then slowly down the sides

just doing a little at a time and pulling evenly and tautly on the felt

watching to make sure I am hiding all my messy underlings.

Then trimming off any excess
 9. Attach the calendar.
 I stapled the calender all together first in the center

then I use the staple gun and stapled the calender onto the board. I did not press to hard here so the staples would not come out the back.
 10. hang it up and start planning
There are a bunch of variations for the use of a fabric covered board I have been thinking of while typing this. I will share a few... It could be a kids award board for chores or potty training or homework charts and such. It could be a to-do board with a planner attached . Or a kitchen shopping center with pockets for coupons and a weekly sales fliers and a pad for grocery lists . You could make a mail organizer with in and out going slots and a calendar for marking bill due dates. There all kinds of free printable planner forms on
this site. And of course you could use a more general lable or none at all, and use this as a calendar board every year just by replacing the calendar sheets every year.
have fun and if you make it I would love to see it!!


 ...The cost will be $20. I will have all the supplies and the machines and the project know how.
 ....but also a fun creative exercise for your more experienced sewers. We will hopefully have enough time to make at least two of these bad boys.
  If there is interest I would be willing to do another party on an evening during the week. I have space for 6 people so let me know if you are interested in participating! You can email me... (bellesouthgirl at yahoo dot com) or contact me through facebook


