Monday, December 21, 2009

Lil' bits Christmas Tree Cards Tutorial

~We made super simple cards this year. They were so easy and you probably already have all the supplies. It was a full family affair Daddy designed and cut our trees.I chose all the bits and cut them and put them in separate bins, Finally Burger decorated them this was his first full on free for all glue project. He liked the second round gluing best( on the red squares) You could easily change the colors of the construction paper. Of course your little one may get bored half way through but it is also a fun creative exercise for you.

Supplies
10 sheets red
5 sheets green construction paper
scraps of other multi colored paper( could be from recycle bin)
glue
scissors
buttons and or cardboard cut into bits
ribbon, yard , string

Instructions

1. design and cut your tree template
. Fold one sheet of paper( any color) in half and cut then in half again and cut so you have 1/4 of the sheet. Fold that sheet in half and free draw your tree on half then cut out.
The negative will be your template.


2 prepare the paper. Fold all your paper in half and cut or using a ruler tear in half . Fold in half again and cut or tear just the green ones. The red will be the actual card. Fold the green in half again .Trace your tree from you original template onto all the green folded sheets and cut them out. We used the cut outs and the negative cut outs for our cards.
3. make your bits bins. We had bins as follows:
ribbon and yarn, buttons and cardboard cut outs about the same size as buttonssome paper bits cut into all sorts of shapes and sizes( we used our scrap paper box here), paper "ribbons"
4. Glue it up. Decorate the trees and half of the red backgrounds. This was Burger's favorite part. I set them aside overnight to dry ( 3 year olds use LOTS of glue)
5. Attach the trees to the undecorated red cards and the negative trees to the decorated cardsLet dry completely.
6.Press between 2 clean sheets of pare under heavy books and your all set to spread some Christmas cheer special made by you and yours.


Friday, December 18, 2009

Nest

~Well I am finally able to sit at the computer for more than email checks, craigslist searches, and pining for other's holiday cheer. We are settling in but WOW moving during the holidays , not so crafty.
I have done lots of online tootling, wishing I did not feel like such a voyeur let me share a little.

~We have managed a tree, that I have not managed to take a decent photo of yet but pictured here on a limb is Komodo...Burger's favorite personality as of late. *We also are managing to make some Christmas cards (lets hope they make it out in time).
I found these tear candle cards which I Loved , but we decided to make trees instead( I hope to show you more later)
* lalalaovin' these super simple cranberry ornaments.
* I really want to make Burger this but a kitchen instead of a barn( he is really onto all these tiny kitchen and food toys ). I think like this version a little better, because burger is not so keen on the softer toys.
we are making cookies, of course the cowboy cookies but also some sugar cookies with "sprankles" on top...I like mine chewy
*I think that faux snowmen are in order for Christmas eve.
*Next years stockings will be....these

Happy happy holidays to al Ya'll , are you feeling merry?

Thursday, December 3, 2009

Finding your Muse... a custom skirt

~I made this custom skirt a while back, but waited to share it till the owner could get it. I had a whole post in my head about finding inspiration in your forgotten surroundings, and how a fresh take on something can really bring to life a whole new vision. Then I got busy with some other things and now we are in the midst of a move so here is the abbreviated version.
~I made this skirt for someone who bought the nasturtiums skirt for her dear friend. She wanted something in that vein but different. I had recently pulled out this floral tea towel that I had stashed and was thinking of using in another apron project. ~I loved the panel with the balls of flowers in combination with the stark straight leaves. ~The nasturtiums were all about the crazy foliage... I liked that these leaves here were so simple and straight changing the whole dynamic of the design.
~Well I loved the skirt so much I wanted to keep it but I did not. I am hoping to make myself a variation before summer.
~Oh well this post was a quickie I just wanted to say "HI" before we went offline for a few days. I will see you in a different place.

Wednesday, November 25, 2009

Pumpkin ravioli ....again and again

~Hi Ya'll, this is a re post from November 2008 ...we are still packing and getting the new house ready. I am working on some Holiday tutorials, hope to post one soon...until then , don't just eat turkey...gobble gobble


In the first 3 months after my son was born ( and the month I was on bed rest before he was born) While learning to nurse, snuggling, and recovering from childbirth(Cesarean) I watched lots and lots of law and order( love me some Chris Noth cicra 1990)

... and the cooking network . My favorite was of course Paula Dean cause well cause she is Paula( it was like my mama was right there instead of in Bama).
But in the kitchen I find I like her tips more than her recipes. When put to the test Giada's Everyday Itailian had the recipes that worked time and time again. they suited mine and daddy's taste best. (my mother in-law , who is a master in the kitchen loves Ina and does well tweaking her recipes but I did not have as good of luck). Any way I learned a lot of smart things from that skinny Italian girl Anyone who pushesNutella as this lady does is alright by me (no matter how skinny she is) . The first was something I tried for valentines; which was chocolate raviolis using wonton wrappers for the pasta and Nutella for the filling. Very delish,very very yummy.
So then My mom got me Giada's book Everyday Italian
and I must say I use it even more that my Loretta Lynn cookbook,"you're cookin' it country"


The great thing about Giada's book is that the recpies are easy to make your own . She has a great marinara that I keep stocked in my freezer, I also use the brown butter sauce recipe(below), on all kinds of pasta.
So what is this post about? Well I had about half of my sugar pumpkin puree' left from the pumpkin zucchini bread I made last week. It was getting past the stage of being able to freeze it. So I decide to make some pumpkin raviolis. Giada actually has a recipe in her book for this but she bought the pumpkin raviolis. I bought some about a month ago and they were so bland that daddy was a little testy during dinner( no meat and bland raviolis).
So anyway I started doing a little recipe hunt and found these beautiful photos of ravioli using wonton wrappers also, on Wandering Chopsticks. This recipe seemed a little too bland for the discerning taste buds of my man so I searched on and found one from Martha.
This one looked interesting but I did not have the Locatelli cheese..and my food budget was already in the fridge this week. So I decided to wing it and the recipe below is what I came up with.

Pumpkin Ravioli

Wonton wrappers
1/12 c fresh pumpkin puree’
1/2tsp kosher salt to taste
Fresh ground pepper
1/4c fresh grated Parmesan
2-3 Tb brown sugar
1 tb fresh chopped sage
1/8 tsp nutmeg

Brown Butter Sauce with Sage
from my memory of
Giada's Everyday Itailian
recipe
6-8 sage leaves torn into pieces
One stick of salted butter (yummy)
Pinch nutmeg
Salt
Pepper
1/2 c grated Parmesan
Adapted from everyday Italian
Cook butter on med heat till pale about 4-6 minutes
Add sage leaves fry in butter till crisp (about 2-3 minute)
Add salt pepper and nutmeg
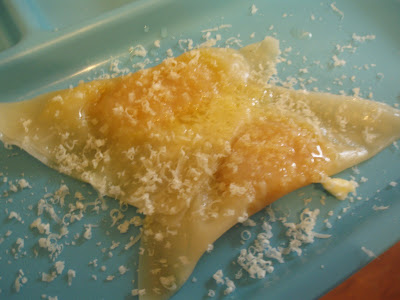
Add ravioli then toss in cheese and serve
Garnish with Parmesan and fresh pepper

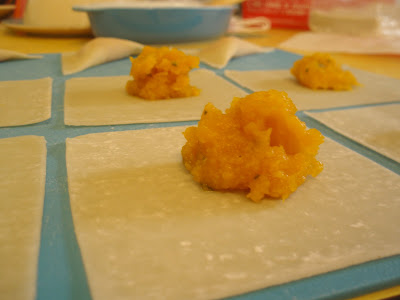
~As you can see I use about half a teaspoon of the filling in each wrapper
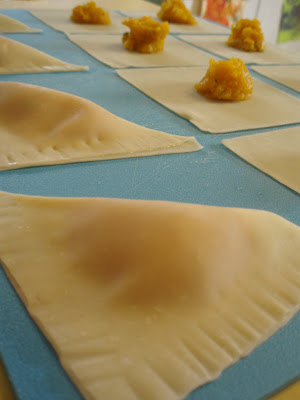
~Then brush one side with egg wash or water if you are out of eggs and fold over into a little triangle and crimp the edges lightly with a fork.~ This amount of filling made about 35-40 raviolis. I did not take photos last night...because honestly I did not have a lot of faith in the recipe I also only made half of the raviolis(for the same reason). So today I made the rest and froze them . ~I also made 2 for Burger's lunch at his request. I didn't bother to make sauce for these; I just put a pat of butter and some Parmesan on them and called it lunch.

~I was surprised to find that they tasted even better today after sitting in the fridge all night I guess the filling reached a peak flavor... Anyway I was very excited and so I am sharing.

Wednesday, November 18, 2009

Moving!


~I guess you could not pick a worst time for me personally to try and move than the first of December. Not only is non stop craft cram time but it is also birthday month. But when you must move, you must... and we are. I might be a little bit gone but I will be pining for a you.

One yard wonders book winner


The winner is Molly Dee!! thanks everyone your comments

Monday, November 16, 2009

Sew mama Sew has Ideas for your Holly daze


~It is time to start making our gifts( or past time). I was happy and surprised (a little) to notice that the local news station had a segment this morning on making your own gifts. I guess it takes most of the country being broke for the mainstream media to embrace the idea of doing something sweet and thoughtful for the gift giving season. Well of course the craft community thrives from the holidays. The tutorials just start bursting out. Luckily we have Sew Mama Sew to help us, with their 3rd annual Handmade Holidays

Sew Mama Sew is helping us all out with kaboodles of holiday gift ideas and the links to go with'em!
And it is full of beautiful crafty inspiration....Today they even included a belle and burger tutorial! So get busy, busy, busy... and have fun fun fun

Wednesday, November 11, 2009

"One Yard Wonders" book review and give-away


~How many times have you been at that little quilting store in some little tucked away town and picked up just a yard of fabric because," you had to have it ...you had never seen it anywhere... and may not ever see it again!!" (gasp)? You may be able to predict from that dramatic re-enactment most of my stash is in increments of one yard.


...Especially because I have so many vintage table cloths and what not. They are always just a yard or maybe a little more. So my peepers are always peeled for projects that can showcase a small amount of "to die for fabric". Needless to say, when recently I got the chance to check out a new book called One yard Wonders, 101 sewing projects, I was pretty intrigued.

~What I found in, One Yard Wonders, was a sewing book that is jammed packed with clever projects that all call for only one yard of fabric( I love this idea) This is a treasury of fun, modern and innovative patterns given to us by Rebecca Yaker owner of Hazel & Melvin's Room and Patricia Hoskins the co founder crafty planet . In a recent interview for better homes and garden's, Team DIY network site
Patricia Hoskins answers the question that I was wondering my self, "How did you come up with 101 sewing projects?"
"One-Yard Wonders is a collaboration not just between Rebecca Yaker, my co-author, and me, but about 70 contributors as well. 101 is a lot of projects! We mostly solicited contributors through blogs, craft forums like Craftster, word-of-mouth, and Crafty Planet newsletters. "


~One Yard Wonders is not just a great book of projects, it also has an invaluable chapter on sewing fundamentals. This section gives you all the basics; from what to stock in what they call your "sewing pantry", to directions for making your own bias tape, and tips on making and using patterns. Plus the diagrams are clear and concise, helping make this a terrific reference book for sewing novices.


~The projects, however cover a wide range of difficulty( making it a great addition to the experienced seamstress's book collection). This book would make a great gift for sure, but the real beauty of this book is it is perfect to make gifts from.

~Other things that make this book THE sewing Book to get for this years gift making/giving season:
*It is spiral bound
*All patterns are included
*It is beautifully photographed with inspirational fabrics and notions.
*Has a wonderful section on the contributors which can function as an online directory for more inspiration

~There really are so many great projects in this book a few of my faves are sprinkled here throughout this review. Believe me it was hard to choose.

~And Now for the big give ~aways....
There are two give -aways that I want to share with you, that involve this book. One is a must enter fabric give-away called Yard of the month sweepstakes that you can enter here by February 28, 2010.(GO LOOK AT THIS IT IS AN AWESOME GIVE-AWAY).
The second give away will be a copy ofthe book One Yard Wonders on this blog next Wednesday Nov 18Th . All you need to do is leave a comment on this post. I will generate a random winner on Nov 18Th . The comments will close at midnight central time on Tuesday Nov17Th. If you want to enter, Please make sure to leave an email address in your comment. Thanks and good luck!!!

Friday, November 6, 2009

The little black shift; A Cynthia Rowley pattern Mash-Up


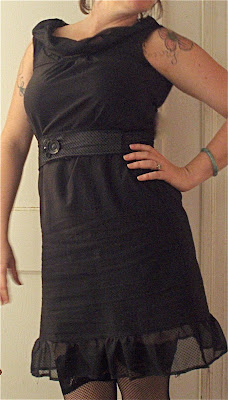
~I recently needed a bridesmaids dress. The the only requirements were it be above the knee and all black.
So I decided I would try to make my own but only if I could do it from stash fabric. I had stocked up on patterns from Cynthia Rowley for simplicity during a recent sale, so I decided to try a few them out.

...I ended up combining these two simplicity patterns:
Cynthia Rowley Simplicity 2593
...and Cynthia Rowley Simplicity2586


~I really loved the rolled top piece on the shirt from Simplicity 2593 ( it is super simple to make this roll and might be easily adapted to a number of designs)
... and I like the idea of a belted shift for this dress. I noticed that the tops of both patterns were the same basic construction so I lifted the roll from 2593 and added it to the the shift of Simplicity 2586.

~I decide to add the ruffle along the bottom from the long sleeved belted version
~I also finished my sleeves with FOE because when I made a practice shirt I thought the sleeves, finished as the pattern called for, were too constricting.

~I decided to change the belt design completely. I designed a belt using scraps
...and then four snaps as closure
...with decorative mix matched vintage buttons on top.
I was very pleased with the finished dress...I thought it was perfect for the occasion and easy to wear.