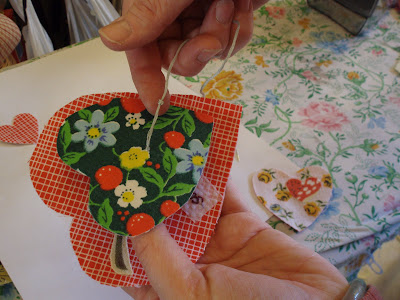
 ~ Valentine's day is one of my favorite crafting opportunities. For one thing most of us have had time to recover from our christmas crafting and are ready to get our hands dirty and pricked again.
 Also, spring is just around the corner and I find making mutliple valentines a great way to flush out my color pallette and give me some insight into what i am feeling for my spring pallette.
Valentines is also a great holiday to surprise family and friends with a valentine, it does always have to be for your boy/girl toy....although those are very fun too. So this years valentine I wanted to play with the idea of heart strings or a little string of hearts.
 It is sort of a take on an accordion style book design. (sort of in my brain)
I love how the hearts all pile on top of each other
 and then the bottom image or message can be revealed as the hearts are pulled up.
~Heart strings valentine tutorial

materials
scrap fabric
heat and bond lite
scissors
embroidery floss
needle
iron
stamp letters(optional)
stencil letters(optional)
small toggle button

Process
1. cut out your biggest heart.Attach heat and bond to the bottom of a scrap heavy to medium weight fabric large enough to accommodate your heart size.
 Fold in half and cut a heart anywhere from 3-6"according to how large you want your valentine.
  Attach a coordinating fabric to the front of your heart following the manufactures instructions for your heat and bond or (equivalent). trim excess fabric around the heart.

2.Repeat this process 3-6 times making a series of shrinking hearts.
 I really liked using light weight and transparent fabrics for the smaller hearts. A fun tip is once you have attached fabric to the bottom of your heart you can even leave a little 1/8 " edge when you trim that you can fray by hand.
3. gussy up your hearts.
 Of course this is where you have the most fun. I made multiples so I could really play around with different looks and ideas. I used decorative scraps of fabric backed with heat and bond to do all my adornments.You can add a valentine message here I liked it on the bottom heart.
  You can embroider, stamp, or stencil. I like the idea of them being quick with the stamping and stenciling or they can be more elaborate with lots needle work and embroidery.* leave a clean spot in the center of your base heart that you can cover with something later.
4. string up your hearts; first the base. Cut and thread approx 12-14 " of embroidery floss. knot one end.
stitch trough the center front of your base heart.
 This knot is what you will cover now with a little decorative scrap of fabric backed with heat and bond.
  Stitch back through the base. Make a knot close to the heart then another about 1" from there.
5. String the rest. make a knot close to the hearts then another a little less than and 1". As you attach each smaller heart make the >1" gap shorter by approx 1/8" each time.


6. attach your toggle button. This will act like a little handle to open the valentine with. here lies a great opportunity to use any little lonely precious toggle buttons

7. Dole out your heart strings


